| Lesson 4 | Install Remote Desktop Services Client |
| Objective | Install Remote Desktop Services Client. |
Install Remote Desktop Services Client
To install the Remote Desktop Services Client on Windows Server 2022, follow these steps:
- Open Server Manager: Click on the Start menu, type "Server Manager," and press Enter.
- Add Roles and Features: In Server Manager, click on "Manage" and then select "Add Roles and Features."
- Select Installation Type: Choose "Role-based or feature-based installation."
- Select the Server: Choose the server where you want to install the Remote Desktop Services Client.
- Select Roles: In the "Roles" section, check the box for "Remote Desktop Services" and click "Add Features" if prompted.
- Select Features: Click "Next" until you reach the "Features" section, then click "Next" again.
- Complete Installation: Follow the prompts to complete the installation process.
The Remote Desktop Server is a client/server product. After installing the Remote Desktop Server software on a Windows 2022 Server,
or Datacenter Server computer, you must install the client software on those machines that need access to the Remote Desktop Server.
The client software is simple to install, and uses very little of the local machine's system resources.
Methods to consider when installing "Remote Desktop Services" Client
To install the Remote Desktop Services (RDS) client on client machines, you can consider the following methods:
Methods to consider when installing "Remote Desktop Services" Client
To install the Remote Desktop Services (RDS) client on client machines, you can consider the following methods:
-
Built-In Remote Desktop Connection (RDC) in Windows
- Pre-installed Software: Windows client operating systems (e.g., Windows 10, Windows 11) come with the built-in Remote Desktop Connection (mstsc.exe) tool.
-
Steps:
- Search for "Remote Desktop Connection" in the Start menu or run `mstsc` from the command line.
- Configure the connection by providing the Remote Desktop Server’s IP address or hostname.
- Save settings for easier reuse.
- No additional installation is needed for this method.
-
Remote Desktop App
-
Microsoft Store or Direct Download:
-
Use the Microsoft Remote Desktop App, which is a
modern client available for:
- Windows: Download from the Microsoft Store.
- macOS: Download from the Mac App Store.
- Android/iOS: Available on Google Play Store and Apple App Store.
-
Use the Microsoft Remote Desktop App, which is a
modern client available for:
-
Steps:
- Search for "Microsoft Remote Desktop" in the respective app store.
- Install and configure the app with the server details.
- Test the connection.
-
Microsoft Store or Direct Download:
-
Group Policy Deployment (Windows Environment)
- Use Group Policy Objects (GPO) to deploy the RDS client configuration or distribute software.
-
Steps:
- Create a shared folder containing the client installation files, if needed.
-
Use Group Policy to:
- Push installation commands.
- Pre-configure RDS connection settings.
- Apply the policy to target users or computers.
-
Scripted Deployment
- Use PowerShell or Batch Scripts to automate the installation of RDS client apps or configuration settings.
- Example for PowerShell:
 Install-PackageProvider -Name NuGet -Force
 Install-Module -Name RemoteDesktop
 # Add configuration commands or installation scripts here
-
Third-Party RDS Clients
-
Consider third-party RDS clients that may offer additional features or
optimizations.
- Example: FreeRDP for Linux-based systems or older operating systems.
- Use Cases: For non-Windows or specialized client systems.
-
Consider third-party RDS clients that may offer additional features or
optimizations.
-
Virtual Desktop Infrastructure (VDI) Client
- If using RDS in conjunction with VDI, ensure the virtual desktop client is correctly installed on end-user devices.
- Refer to the specific VDI platform documentation (e.g., VMware Horizon, Citrix Workspace).
-
Manual Installation via Network Share
-
Manually copy the client setup executable to client devices using:
- USB drive.
- Network share.
-
Steps:
- Place the installer in a shared directory on the RDS server or another accessible location.
- Provide users with a link or script to download and install.
-
Manually copy the client setup executable to client devices using:
- For most environments, the built-in RDC tool or Microsoft Remote Desktop app is sufficient.
- For large-scale deployments, use GPOs or scripts for efficient distribution and management.
- Ensure compatibility between the client software and the server environment, especially for multi-platform support.
Legacy Installation Methods on Windows Server
- Terminal Services for 16-bit Windows (requires 4 disks)
- Terminal Services for 32-bit x86 Windows (requires 2 disks)
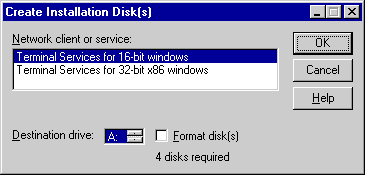
- Insert a disk into the destination drive.
- After copying the files to the disks, close the Create Installation Disk dialog box, or click OK to create more disks.
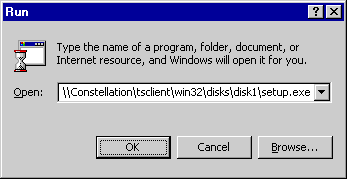
Installing client software over Network The source files for Terminal Services Client are stored in the systemroot\System32\Clients\Tsclient folder on the Terminal Server. The Tsclient folder contains the Net, Win16, and Win32 subfolders. To enable users to access Terminal Services Client over the network and install it on their computers, share the folders for the appropriate platforms. Users can then run Setup.exe from one of the shared folders.
Installing Remote Desktop Services Client
Before installing Remote Desktop Services Client, ensure that the client computer is properly configured and connected to the network. To practice installing Remote Desktop Services Client, try the following Simulation.
In the next lesson, you will learn to establish a Remote Desktop session.
In the next lesson, you will learn to establish a Remote Desktop session.
Install Remote Desktop Services Client - Exercise
Click the Exercise link below to practice running the Remote Desktop Services Client software.
Install - Remote Desktop Services Client - Exercise
Install - Remote Desktop Services Client - Exercise